Difference between Accuracy, Tolerance, Uncertainty, and Error
What is Accuracy?
Accuracy is the closeness of agreement between a measured quantity value and a true quantity value of a measurand.
Accuracy is defined by the manufacturer.
Accuracy Example:
The accuracy of the Industrial Pressure gauge is 2 % F.S (2 % of Full-Scale reading)
i.e Accuracy of Pressure Gauge of Range 0 to 40 bar is ± 0.8 bar. Means any measure reading can be vary ± 0.8 bar.
Reading of 20 bar can be in between 19.2 bar to 20.8 bar. Any reading between them is an accurate reading.
What is Error?
Error is difference between measured value and reference value.
I.e. Error is difference between UUC (Unit under Calibration) reading and Master Reading.
Error Example:
The Master Pressure Gauge reading is 20 bar. And UUC reading is 19.8 bar.
Error is 19.8 – 20 = 0.2 bar
Difference between Error, Correction, Deviation
Error = Reading – Reference value
Correction = Reference value – Reading
Deviation or difference can be calculated either way
What is Tolerance?
Tolerance is the maximum deviation that is accepted in the design of the user for its manufactured product or components.
Tolerance is defined by user according of need of product.
Tolerance Example:
For automobile manufacturing, it needs a piece of metal of 10 mm with a tolerance of ± 0.01 mm.
In this case measurement of the length of a piece of metal should have an accuracy of more than 0.01 mm.
Most of the time, people get confused between Accuracy and Tolerance and they are used as synonyms. But both terms are different.
Accuracy is manufacture defined and Tolerance is User-defined.
What is Uncertainty?
Uncertainty is the quantification of the level of doubt we have about any measurement.
Uncertainty means how certain or uncertain are we on measured readings.
No reading is 100% accurate. It has some level of uncertainty present.
Uncertainty includes many factors like Personal Skill, Resolution of Instrument, and Accuracy of Instrument, etc.
We should combined Uncertainty and Error to find whether given instrument is within accuracy or within tolerance or out of accuracy or tolerance.
Most of the times we compare only ‘Error and Accuracy’ or ‘Error and Tolerance’ and Uncertainty factor is not considered. This is and wrong practice.
Every time while commenting on the result as ‘Pass and Fail’ of the instrument, the uncertainty of measurement should be considered.
What is a Decision Rule?
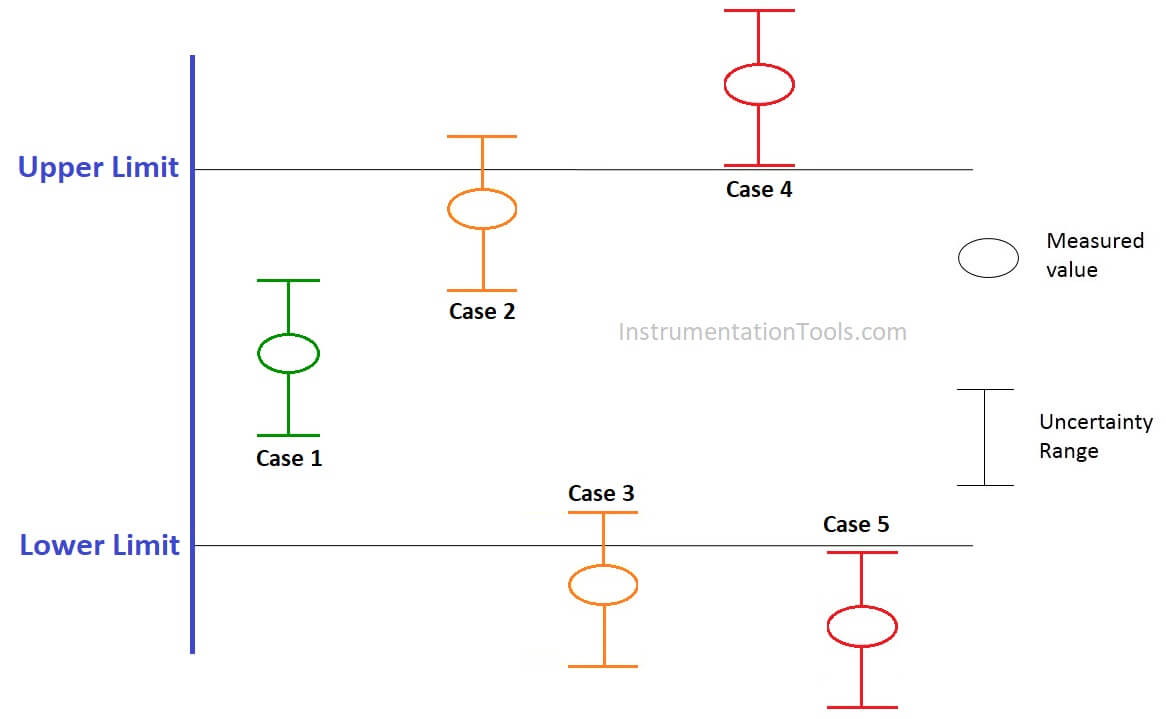
Below are the decision rules
- If the measurements are within the tolerance including the uncertainty, then it is a ‘pass’.
- If the measurements are outside the tolerance including the uncertainty, then it is considered ‘fail’ or ‘out of tolerance’.
- If one of the uncertainty limits is outside the tolerance while the other limits are inside the tolerance limit, then it is not a pass or a fail, we call it ‘Indeterminate’. The decision now is based on the user.

In the above Figure, Upper Limit and Lower Limit are Tolerance ranges.
Case 1
Measured value including uncertainty range is within the tolerance limit. Hence, ‘PASS’
Case 2
The measured value is within the tolerance limit but the uncertainty range partially lies outside the tolerance limit. Hence, ‘Indeterminate’
Case 3
The measured value is outside the tolerance limit also uncertainty range partially lies outside the tolerance limit. Hence, ‘Indeterminate’
Case 4
The measured value is outside the tolerance limit also uncertainty range lies outside the tolerance limit (Upper Limit). Hence, ‘FAIL’
Case 5
The measured value is outside the tolerance limit also uncertainty range lies outside the tolerance limit (Lower Limit). Hence, ‘FAIL’

No comments:
Post a Comment